+86-769-85303229 +86-13763283864 jennyguo@fazcwj.com
Views: 0 Author: Site Editor Publish Time: 2025-09-01 Origin: Site


Ever wondered what makes that satisfying "click" in knobs or fixtures? It’s often a spring plunger—a small part with a big job. From holding sliding doors in place to aligning machine components, spring plungers are everywhere. Choosing the wrong one can lead to loose fits or worn-out parts.
In this post, you’ll learn what a spring plunger is, how it works, and how to choose the right type for your needs.
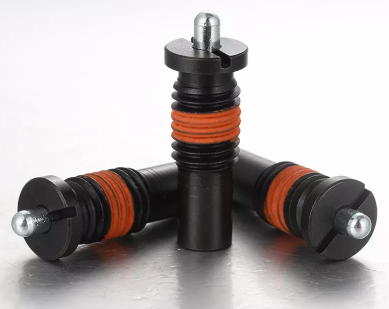
A spring plunger is a small mechanical part used to position, index, or lock components into place. It's built to push forward with spring pressure and settle into a groove, hole, or surface. You’ll often find them hidden inside jigs, knobs, sliders, or even hinges. They help things "click" into the right spot and stay there until moved again.
Each spring plunger has three main parts: the body, the spring, and the nose. The body holds everything together. It can be smooth or threaded, depending on how it's installed. The spring sits inside the body and creates pressure by pushing the nose outward. That nose, or tip, can be shaped like a ball, a pin, or a flat point. The shape depends on how precise or gentle the contact needs to be.
When the nose is pressed against another part, the spring compresses. Once released, it pushes the nose back out. That back-and-forth motion is what creates the repeatable "click" or locking action. It works great for quick setups or consistent positioning.
Now, here's where things get specific. A spring plunger is a general category. A ball plunger is one type, with a rounded tip that slides smoothly into place. It’s forgiving and works well even if things don’t line up perfectly. An indexing plunger, though, is different. It has a solid pin that locks more tightly and often needs to be manually pulled back before moving the part. Spring plungers are about pressure and feel, but indexing plungers are about true lock and hold.

Each type has its role, and choosing the wrong one can lead to shaky setups or hard-to-move parts. So understanding how they work makes all the difference.
Spring plungers show up in more places than you might expect. They're used in manufacturing tools, electronics, automotive components, medical devices, and even furniture hardware. Any time a part needs to hold its position or "click" into place, a spring plunger might be doing the job behind the scenes.
One of their most common roles is handling detents. That’s when a part moves into a set position and stays there until you apply pressure again. You’ll also see them used to preload parts, removing gaps or play between surfaces. In machines that vibrate or move a lot, they help prevent rattling by keeping parts snug. For light-duty holding tasks, they’re a clean and simple option that doesn’t require extra clamps or screws.
But they’re not built for everything. You should avoid using spring plungers when a part needs to stay locked under heavy loads or torque. They aren’t meant to stop large forces or secure parts during major impacts. In those cases, you'll want to switch to something stronger.
Here’s a quick list of better options for high-strength or locking needs:
| Application need | Better choice |
|---|---|
| Locking under load | Indexing plunger |
| Holding against torque | Locking pin |
| Precise vertical hold | Shoulder bolt |
| Repeatable strong engagement | Indexing plunger again |
Spring plungers work best when you want positioning that’s easy, repeatable, and smooth. If you're dealing with delicate materials, sliding panels, or light equipment parts, they’re a go-to choice. But for parts that need to lock tight or handle stress, you'll want something made to take that kind of force.
Spring plungers are built around force. It’s what gives them their function. Each one has two force values: initial and final. The initial force is what you feel at first contact. The final force is what it pushes out when fully compressed. Both matter.
If you're working with soft materials or need frequent movement, a light-force plunger is the better choice. It’s easy to press, won’t damage surfaces, and gives a gentle feel. Standard force is the middle ground. Most setups—like fixtures, panels, or guides—work well here. It holds parts in place without needing too much pressure. Then there’s heavy force. That’s for tough environments, where vibration or sudden impacts could knock a part out of place. These are harder to press in but great when you need a strong hold.
If you’re not sure, start in the middle. It’s easier to machine a shallow detent than to deal with an overly stiff setup.
The nose is the part that actually touches the mating surface. It controls how the plunger feels and how it performs. Ball tips are the most common. They roll into place, align easily, and work well on slightly angled surfaces. Flat tips are wider and apply pressure more evenly. They’re used for gentle contact without a click. Pointed tips give a sharp feel and fit tight into small recesses, though they might scratch softer parts. Roller noses are for sliding contact and reduce friction in setups that move side to side.
If your application uses polished or coated surfaces, switch to a nylon or Delrin tip. These plastic materials protect finishes, reduce noise, and still hold things in place.
Here’s a quick comparison:
| Tip Type | Best For | Notes |
|---|---|---|
| Ball | General indexing, panels | Smooth feel, self-aligning |
| Flat | Preload, anti-rattle | Low profile, no defined click |
| Pointed | Precision detents | Sharp feel, may mark surfaces |
| Nylon Ball | Soft or coated surfaces | Quiet, non-marring |
| Roller | Sliding contact | Reduces wear and friction |
Travel is how far the nose moves in and out. It’s not just about how deep it can go, but also how it feels during use. If the travel is too short, the spring might bottom out early. That causes a harsh stop or even damage. Too much travel, and the plunger may not engage properly or feel mushy.
You want the stroke to match the geometry of your detent or groove. That means the nose should enter far enough to seat securely, but still have room to compress. It helps to prototype different depths to find the right match. Also, make sure the spring never hits its hard limit too early, especially under repeated cycles. That’s one way to shorten the plunger’s lifespan quickly.
When selecting a spring plunger, the material of each part affects how it performs in different conditions. The body, spring, and tip all have to match the demands of the application. Some setups face moisture, some involve soft surfaces, and others need to avoid rust or sparks. Getting the material wrong can lead to early failure, corrosion, or damage to mating parts.
Stainless steel is a common choice for both body and tip. It holds up well in humid, marine, or chemical environments and doesn’t rust easily. If you’re designing equipment for food processing or medical use, stainless is usually the safest pick. Black oxide steel works well indoors where moisture isn't an issue. It’s cheaper than stainless but offers only light corrosion protection. Brass is softer, non-magnetic, and spark-resistant. It’s a good fit for electronics, fuel systems, or places where metal contact needs to stay quiet. For lightweight or low-force designs, plastic bodies made from Delrin or nylon can be used. They don’t corrode and are often non-conductive, which makes them ideal for sensitive electronic areas.
The tip deserves just as much attention. A hardened steel nose is tough and resists wear under repeated contact. Stainless tips add corrosion resistance without sacrificing strength. But if the plunger touches finished surfaces like anodized aluminum or painted parts, switching to a nylon or Delrin tip helps prevent scratching or scuffing. These soft tips are also quieter and reduce friction during sliding contact.
This table outlines common material options and where they fit best:
| Part | Material | Best Use Conditions |
|---|---|---|
| Body | Stainless Steel | Wet, corrosive, marine, or food-grade environments |
| Body | Black Oxide Steel | Dry indoor setups, general machinery |
| Body | Brass | Non-sparking, low-magnetic, light-duty circuits |
| Body | Delrin/Nylon | Lightweight, non-conductive, corrosion-free zones |
| Tip | Hardened Steel | High-cycle contact, tough metal interfaces |
| Tip | Stainless Steel | Corrosive zones, smooth metal detents |
| Tip | Nylon/Delrin | Soft metals, coatings, plastic or polished parts |
If you're working with soft materials like aluminum, it's better to avoid steel-on-metal contact. A stainless body combined with a nylon tip gives you strength and surface protection. For assemblies exposed to cleaning agents, check the chemical resistance of each material before locking in your choice.
Spring plungers come in different body styles, and how you mount them affects both performance and ease of use. Some designs are made to screw into place, others press in without threads. A few versions install from the front using a flange to stop the plunger from sliding too far. Understanding these differences helps avoid alignment issues or early loosening once the assembly is in use.
Threaded plungers are the most common. They screw directly into tapped holes and can be tightened or removed using tools. These work well in setups where parts need to be serviced or replaced later. Push-fit, or press-fit, plungers don’t have threads. Instead, you press them into a precision reamed hole. They save space and give a cleaner look, especially when the part needs a flush or smooth outer surface. Flanged plungers install from the top side and stop when the flange contacts the surface. That’s useful when you can’t access the opposite side or when you want to control the insertion depth.
Choosing the right mounting method depends on access, holding strength, and how permanent the installation needs to be. Threaded styles give flexibility and are better for heavy use or vibration. Push-fit types work best in lightweight setups or thin materials where threading isn’t possible. Flanged options are common in sheet metal parts or fixtures where the plunger is installed from the front.
Each style comes with different thread sizes and drive types. For threaded plungers, common sizes include M4 to M12 in metric, and 1/4-20 or 5/16-18 in inch units. Hole preparation matters here. For threaded styles, make sure the tapped hole has enough depth for full engagement. For press-fit types, the hole diameter needs to match the body exactly. Too tight, and it might deform the part. Too loose, and the plunger may fall out under force or vibration.
Torque also plays a role. Over-tightening can crush the spring inside or deform the housing. Always follow the recommended torque from the product sheet, especially in soft materials like aluminum.
Drive types control how you install the plunger. Some use a hex socket, where you tighten with an Allen wrench. Others have a slotted head, like a traditional screw. There are also versions made for blind holes that use a top slot. These are installed from above and don’t require access to the side.
The table below compares body styles and where they fit best:
| Body Style | Installation Method | Best For |
|---|---|---|
| Threaded | Screw-in | Durable setups, serviceable parts |
| Push-Fit | Press-in | Clean appearance, soft or thin materials |
| Flanged | Top-inserted | Sheet metal, limited rear access |
Choosing the right mounting method can improve not just performance but also how easy it is to adjust or maintain your assembly later.
Over time, even a perfectly installed spring plunger can work itself loose. Machines vibrate. Parts move. Threads shift. It’s not always obvious at first, but eventually the plunger can back out just enough to affect how it holds. If that happens, the detent feel may go soft or the plunger might fall out entirely.
This is especially common in equipment that faces constant motion or impact. Vibration shakes the threads loose little by little. If you’re using a threaded plunger without any locking feature, this becomes a real problem. Luckily, there are a few ways to keep everything locked in place.
One of the most popular solutions is a nylon patch, sometimes called Nylok. This is a pre-applied nylon coating on the threads. It adds friction and grip once you tighten the plunger into a hole. Unlike glue, it doesn’t harden or bond the threads, so you can still remove and reinstall the part. It’s clean, reliable, and widely available from most manufacturers.
If your plunger doesn’t come with a patch, threadlocker can do the job. This is a liquid adhesive that you apply before installation. Once cured, it holds the threads tight against vibration. Use a medium-strength version if you plan to remove the plunger later. Just make sure the threads are clean and dry before applying it. Dirty threads reduce holding strength and can cause uneven curing.
Jam nuts offer another layer of protection. You add a small nut behind the plunger after installation, then tighten it against the surface. This creates a mechanical lock that resists loosening, even when the plunger is under constant stress. It’s a simple fix and works especially well when the plunger needs to stay at a specific depth.
For high-vibration environments like CNC machines, assembly lines, or transport equipment, combining these methods often works best. A plunger with a nylon patch plus a jam nut gives double protection. If you're using softer materials like aluminum, keep an eye on thread engagement and avoid over-torquing during install. That way, the threads won’t strip or deform under pressure.
Not every spring plunger follows the standard design. Some versions solve very specific problems in demanding environments. If your application involves extra travel, constant contaminants, or requires manual control, these special types might fit better than the basic models.
Sealed spring plungers are built for harsh conditions. They come with internal seals or O-rings that keep out dust, chips, oil, or coolant. In places like machining centers or areas that spray cutting fluids, this sealed design protects the internal spring from jamming or corroding. It keeps the mechanism working longer and reduces the need for cleaning or maintenance.
For setups where more stroke is needed, long-travel plungers are available. These provide an extended range of motion compared to standard models. That extra movement helps when parts need to shift further or when there's more variation in alignment. A longer stroke gives a wider window for the nose to catch a detent without forcing the spring to bottom out.
Sometimes, pressure needs to come from the side. That’s where side-thrust plungers come in. Instead of pushing straight out, they apply force laterally. These are often used to clamp a part sideways against a stop. It's useful in tight assemblies or light-duty fixtures where a standard vertical plunger can’t be used. The small side pin presses directly into the edge of a workpiece.
There are also hand-retractable plungers. These come with a knob, ring, or lever that lets you pull back the nose manually. Some even stay retracted until released again. They’re perfect for fixtures where the part must move freely, then lock into place. Think of jigs or racks that get loaded and unloaded often. The operator can pull the plunger back, move the part, then let it snap back when ready.
Getting the size right on a spring plunger isn’t just about fitting it in the hole. It affects how well the part locks, how long it lasts, and how smooth it feels in action. There are a few key things to consider when sizing your plunger for the job.
Start by picking the correct thread size and overall length. The thread needs to match the hole, but that’s not all. The material it’s going into also matters. In softer materials like aluminum or plastic, deeper thread engagement helps prevent pull-out. A general rule is to use at least one full diameter of thread in aluminum and about three-quarters in steel. If the material’s too thin to hold threads, inserts or press-fit designs might work better.
For the detent pocket, shape and depth control how the nose seats. A pocket that’s too shallow won’t hold well, and one that’s too deep can bottom out the spring. A good starting depth is around 25 to 40 percent of the nose diameter. Adding a slight chamfer or radius at the entry makes the engagement feel smoother. That’s especially helpful if parts need to rotate or slide into position. Always test a few variations during prototyping to find what feels right.
When working with aluminum, it’s smart to avoid direct steel-on-aluminum contact. Over time, the nose can dig in or wear the surface. Hardened bushings or guides can solve that. Just press one into the detent location and let the plunger nose press against it instead. This protects the soft surface and extends the life of the whole assembly.
Nose projection also plays a part. That’s the amount the nose sticks out when the plunger is at rest. It needs to be long enough to engage the detent but short enough to avoid jamming. And there should always be enough spring travel left to compress fully without hitting a hard stop. If the nose bottoms out too early, the plunger won’t feel right—and the spring might get damaged.
Choosing the right spring plunger starts with understanding four key pillars: force, material, nose type, and installation. Each one plays a part in how the component performs and feels in real-world use. To avoid costly mistakes, it’s smart to prototype early and run tests across full motion cycles. Don’t skip the small stuff—manufacturer datasheets and field testing offer critical insights that design software can’t always catch. When you match spring plunger specs to how your product functions and feels, you’ll end up with a smoother, longer-lasting result.
A spring plunger is the broad category. A ball plunger is a specific type that uses a round nose to slide smoothly into detents.
No. Spring plungers are for light positioning or detents. For secure locking under load, use indexing plungers or locking pins.
Use anti-loosening options like a nylon patch, threadlocker, or a jam nut to keep it secure in high-vibration setups.
A nylon or Delrin tip is ideal for soft materials like aluminum, since it prevents scratching and reduces noise.
Start with a light or standard force. Choose heavier force only when dealing with vibration, side-loads, or larger detents.


